How to make a canopyThe canopy looks best on a sandstone patio I think, but since I didn't have one available, I use a small tower for the demonstration. These instructions can be used to build a canopy of any size, and can also help with building a rooftop shed. In general: the canopy consists of uprights made with torches, with 2 pieces of dyed cloth as roof, and gnarled staves. If you wish to make a hut with closed walls instead, use the same principles but instead of uprights, build walls of quarter staves and stacks of 2 logs. Tip: When building the upright, you may want to lock down only one in three torches to save on lockdowns. Just make sure you lock down the topmost and bottommost torch.
Stack and lockdown torches on the north-eastern upright, until you reach the maximum height. Then remove the two topmost torches; we need that space for the gnarled staff that will form the horizontal support, and the cloth that makes the roof. (The gnarled stave should be one slanted to the left. They are not craftable, but you may obtain them sometimes from a provisioner or a slain monster. If you cannot find one, leave it out but place an extra torch on the upright).
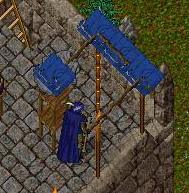
The right hand picture shows the two northern uprights completed, the crate smashed and the horizontal upright in place. The cloth has been placed on the two uprights, and a temporary rig has been built to position another cloth in the middle.
The right picture shows that on the west side of the canopy there is no upright. Instead I have built a rig up to maximum height, and removed the top 3 items, and replaced them with a deathrobe, horizontal support and roof cloth. After locking down the gnarled staff and cloth, and waiting for the robe to decay, I remove the tables and spacers.
The usual procedure: stack torches until you're two torches shy of the maximum height. Place the box with the gnarled staff in it, and smash it. Place the cloth on top.
In case you end up with an upright in the southeast corner of the canopy (as is not the case here), you will need to use a trick to put both the left and right slanting gnarled staves at the same height. Simply place a box on top of the upright, and place both a left slanting and a right slanting staff in the box. When you smash it, they will have the same position on the z-axis.
Well, that is all there is to it! The neat thing about these canopies is that when you step under them, the roof disappears! Enjoy! |
||||||||||
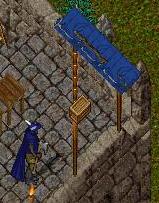
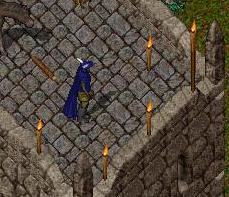 First
we position the uprights by placing torches. You'll get the best result
if you place the uprights two tiles apart, but don't worry if you cannot manage
that.
First
we position the uprights by placing torches. You'll get the best result
if you place the uprights two tiles apart, but don't worry if you cannot manage
that. 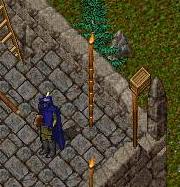
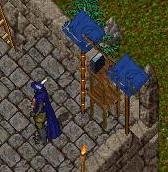 If
you have troubles placing the gnarled staff on top of the pile, use a small
crate. Put the gnarled staff in the crate and put the crate on top of
the upright. Smash the crate with an axe, and the gnarled staff will pop
out.
If
you have troubles placing the gnarled staff on top of the pile, use a small
crate. Put the gnarled staff in the crate and put the crate on top of
the upright. Smash the crate with an axe, and the gnarled staff will pop
out.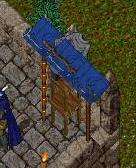 I
have used a deathrobe to speed up the placing of the middle piece of cloth.
Instead of a deathrobe, you can lock down the rig and spacers except the top
spacer. When the top spacer has decayed, unlock and remove the rig.
I
have used a deathrobe to speed up the placing of the middle piece of cloth.
Instead of a deathrobe, you can lock down the rig and spacers except the top
spacer. When the top spacer has decayed, unlock and remove the rig.
 Now
we work our way south. Again I used a box to make placing the horizontal
support gnarled staff easier. To make the upright, stack torches until
the maximum height, and remove the two topmost ones. Then place the crate
as shown in the left picture, and smash it.
Now
we work our way south. Again I used a box to make placing the horizontal
support gnarled staff easier. To make the upright, stack torches until
the maximum height, and remove the two topmost ones. Then place the crate
as shown in the left picture, and smash it.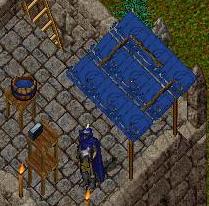 Now
all that remains is filling in the rest of the roof. Just use tables,
spacers and deathrobes to reach the correct height, and place the cloth.
The result begins to look like a canopy!
Now
all that remains is filling in the rest of the roof. Just use tables,
spacers and deathrobes to reach the correct height, and place the cloth.
The result begins to look like a canopy!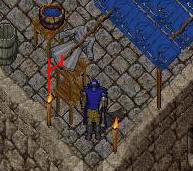 This picture shows that at the south end, the remaining space is only half a
gnarled staff's length. Not to worry, we will place another gnarled staff
on top of the southern upright, and it will neatly overlap with the staff shown
in this picture.
This picture shows that at the south end, the remaining space is only half a
gnarled staff's length. Not to worry, we will place another gnarled staff
on top of the southern upright, and it will neatly overlap with the staff shown
in this picture.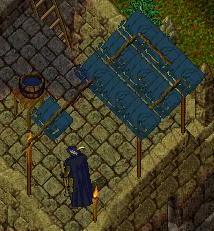 As
you can see, the gnarled staves overlap to form a single horizontal support.
As
you can see, the gnarled staves overlap to form a single horizontal support.