| In
the corrupted forest of Malas, east of the Necromancer city
of Umbra, lies the entrance to the terrible dungeon of Doom.
The dungeon is a dangerous place filled with all manner
of traps and monsters more vicious than most, but as with
most places of evil, Dungeon Doom also holds great riches
for those adventurers who dare to enter.
The entrance itself is an immense dark stone structure
littered with the remains of previous visitors to the dungeon,
some human and some definitely not human. Stairs descending
down under the structure lead only to a small underground
room containing nothing of interest, nothing except a hole
in the ground that is.
The only way forward from there is to jump. Down the hole,
down to your Doom...
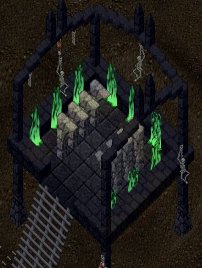
Point A: Doom Entry Point
Once you're inside the dungeon of Doom the grim reality
dawns upon you.. The hole where you entered is far above
and out of your reach, there is no way you're going to get
out the same way as you got in.
So what do you do if you need to get out of there and you
just used your last reagents or runebook charges? Or even
worse, if you're dead?
The answer is simple: You walk to the moongate, which
is in the far northeastern corner of the dungeon, past the
countless monsters that roam the hallways. The moongate
will take you outside to the corrupted forest.
Point B: Exit Moongate
However, if you are in the Gauntlet area of the dungeon
you won't be able to get to this exit. Have no fear though,
because there is an identical moongate on the beach just
next to the ferry.
Scattered around the entire dungeon one can find strange
items known as artifacts. Although these artifacts seem
to just be laying there for the taking, that unfortunately
isn't possible because they a magically locked to the ground.
The only way to obtain these artifacts are by being an
exceptionally good thief, with at least Grandmaster status
in the Stealing skill. The skilled thief can simply try
to steal the items from the ground, the higher skill he
has, the better are his chances of succeeding.
The artifacts are divided in a number of levels, level
1 being the lowest and level 12 the highest. For each level
the artifact has, the time it takes for it to re-spawn increases,
so while a level one only takes around 90 minutes, a level
3 may take around 6 hours or more.
The following is a list of all the known stealable artifacts
and their level.
| Artifact |
Level |
Respawn Time |
| Damaged Books |
1 |
1.5 Hours |
| Bottle (Bong) |
1 |
1.5 Hours |
| Rock |
1 |
1.5 Hours |
| Skull Candle |
1 |
1.5 Hours |
| Stretched Hide |
2 |
3 Hours |
| Brazier |
2 |
3 Hours |
| Lamp Post |
3 |
6 Hours |
| Books (Stacked) |
3 |
6 Hours |
| Books (Face down) |
3 |
6 Hours |
| Studded Leggings (Hanging) |
5 |
1 Day |
| Egg Case |
5 |
1 Day |
| Skinned Goat |
5 |
1 Day |
| Gruesome Standard |
5 |
1 Day |
| Bloody Water |
5 |
1 Day |
| Tarot Cards |
5 |
1 Day |
| Backpack (Reversed) |
5 |
1 Day |
| Studded Tunic |
7 |
4 Days |
| Cocoon |
7 |
4 Days |
| Skinned Deer |
8 |
8 Days |
| Saddle |
9 |
8 Days |
| Leather Tunic (Hanging) |
9 |
16 Days |
| Zyronic Claw (Magic Weapon) |
10 |
1 Month |
| Titan's Hammer (Magic Weapon) |
10 |
1 Month |
| Blade of the Righteous (Magic Weapon) |
10 |
1 Month |
| The Inquisitor's Resolution (Magic Gauntlets) |
10 |
1 Month |
| Ruined Painting |
12 |
4 Months |
The Respawn times listed are only approximate numbers,
they may vary by +/- 20%. It is measured from when the item
last spawned, not when it was stolen.
While most of the stealable artifacts are strictly decorative
items, there are a few of them that are weapons or armor
imbued with powerful magical properties. Descriptions of
those can be found here.
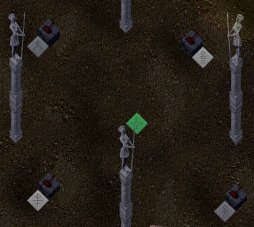
Point C: The Lever Puzzle
In the northern end of the large hall west of the entrance
to the dungeon stands four tall statues. Between the statues
are 5 pressure pads and 4 levers, these are all part of
a devious and lethal puzzle.
To solve the puzzle you have to be in a group of at least
5 people. Each person will have to stand on one of the pressure
pads, and then the trick is to figure out which order the
levers have to be pulled. Unfortunately this will have to
be done by trial and error at first and error usually means
death to a few of the people present.
When all four levers have been pulled one of two things
will happen. If they were pulled in the wrong order, large
boulders will fall from above and hit everyone in the area
for a great deal of damage. In addition the that the statues
will give you a little clue about what you did wrong. If
the levers were pulled in the correct order, the person
standing on the green pressure pad in the center of the
statues, will be teleported to a small room with no doors,
a room commonly known as the lamp room.
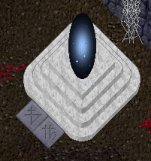
Inside the lamp room there can be three things of interest.
The first is the level 3 stealable artifact Lamp Post. The
second is the level 10 stealable artifact gauntlets "The
Inquisitor's Resolution". The third is a small golden
box placed on the table in the center of the room.
The golden box turns out to be a cleverly concealed trap
when opened though, as a strange creature, known as the
Wanderer of the Void, will appear when the lid is lifted.
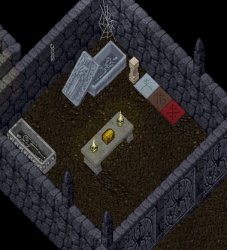
Point D: The Lamp Room
As if one trap wasn't enough in this small room, once you
enter the room a lethal gas will start to seep in though
cracks in the walls. At first the gas will merely make you
a bit nauseous, but over time it grows more concentrated
and if you do not escape quickly you will surely collapse
in there and die.
In the far northern end of the dungeon, behind 3 sets of
double doors, lies room which is one of the most deadly
traps known. From the doorway you immediately notice the
large piles of human remains just a few steps into the room,
but the cause of their death isn't apparent from there.
Other things of interest in the room are two large statues
near the door, a stone pentagram in the center of the room
and a few chests hiding untold riches.
Once you step a few steps into the room, the cause for
all the skeletal remains becomes clear though. The massive
doors will slam shut and become impossible to open, from
out of nowhere a number of Dark Guardians, a creature closely
related to the Lich, will appear on the pentagram and deadly
poison will slowly start to fill the room, making it increasingly
harder to breathe in there.
For each creature in the room two Dark Guardians will appear
and now only one thing remains... Kill or be killed. If
you manage to kill all the guardians the poison will clear
the air, the doors will unlock and you are free to leave.
If the guardians manage to kill you, they will disappear
and the same things will happen, although when your ghost
tries to leaves the room it will be transported to a location
in the other end of the dungeon along with your remains.
One of the main reasons to enter Dungeon Doom can be found
in a room to the southeast of the entrance. In the corner
of that room lives an ancient sorceress by the name of Victoria,
who has been cursed to wander the unholy halls for all eternity.
Point F: Victoria the Sorceress
Victoria has an interesting tale to tell about a creature
she calls the Dark Father and also someone called Chyloth
the Ferryman. Apparently she once tried to kill the Dark
Father, but failed and became cursed instead. To get her
revenge for that she will offer to help you get across the
lake to the area known as the Gauntlet, where the Dark Father
can be summoned.
To receive her help you will however first need to collect
1000 Daemon Bones, which can be found on all creatures in
the dungeon. The more powerful the creature, the more bones
it will have.
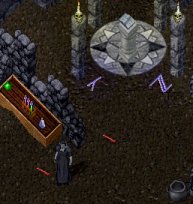
Once you have given the 1000 Daemon Bones to Victoria she
will summon a powerful Bone Daemon for you to defeat. If
you manage to dispose of the Daemon, searching its corpse
will yield a strange golden skull, which will be your ticket
across the lake.

The Bone Daemon Summoning Pentagram
If you at any point leave the dungeon, after the Daemon
has been summoned for you, and you haven't received a skull,
the 1000 bones will be returned to you.
Now that you have a golden skull, head for the beach at
the lake in the southern end of the dungeon. When you get
there you should find a dark platform with a large bell
hanging above it. This is the Bell of the Dead and once
rung it will summon a mysterious figure known as Chyloth
the Ferryman.
Chyloth will yell at you a bit at first, something about
only the dead may cross, but if you hand him the golden
skull, he suddenly changes his mind and lets you and everyone
in your party hop aboard his ferry and sail across the lake.
Summoning Chyloth without giving him a skull is not something
that is advisable, as Chyloth has a very dangerous pet at
his disposal. If you do so anyway, running away would be
the best advice, because otherwise you might find yourself
in the belly of a Skeletal Dragon.
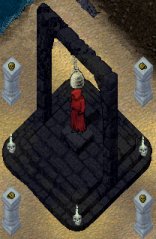
Point G: Chyloth and the Bell of the Dead
Finally you are at the infamous Gauntlet of Doom. A place
of untold riches and an untold number of dead adventurers.
The first thing you should do once you get here, is familiarize
yourself with Nix the Variety Dealer. Nix can be found by
walking through a wall in the eastern side of the hallway
leading south from the beach, there he has made a small
shop where he sells all manner of supplies, that could be
useful to the brave adventurer.
Further down the hallway you will reach a large hall with
six pentagrams on the floor, this is the center of the Gauntlet.
The Gauntlet is made of a five rooms, each with a some very
powerful creatures in them, the number of which depends
on the number of people in there. The rooms will have to
be defeated in a clockwise direction from the entrance and
once you enter an active one you can only leave by death,
either yours or the monsters in the room, as the doors to
the room will be locked.
If you should happen to die in the Gauntlet, and you most
likely will, all hope isn't lost. In the northwestern room
lives a kind healer, who will help you find your path back
to life for the small fee of 5.000 gold pieces.
Now that you know the place a bit better, let's get on
with business... The first room, which is the eastern one,
is inhabited by creatures know as Darknight
Creepers, strange creatures that seem to have several
torsos stacked upon each other. You will have to get rid
of all of them if you want to get out again in one piece.
Once the first room is cleared, you can proceed to the
next one, the one to the southeast. This one is inhabited
by Flesh
Renderers, a type of giant insect that moves at an amazing
speed and has the ability to knock you off your mount. You
will have to move fast to get out of this one.
The third room is not for people who fear long sharp objects,
it is inhabited by Impalers,
who instead of hands have long sharp and pointy spikes at
the end of their arms. A strong armor or a lot of running
around is required here.
The fourth room is by many considered the easiest one,
it is inhabited by Shadow
Knights, a group of undead warriors who have the ability
to hide and stealth around. Once they are revealed they
shouldn't pose much of a threat to the experienced fighter.
Finally the fifth and final room is now open to you. In
there the Abyssmal
Horrors await with their powerful magic skills ready
to fry you. The key to surviving this room is plenty of
resistance and a lot of physical damage.
With the fifth room defeated, you should head out into
the center of the Gauntlet again. Here you will find the
fruit of your hard labour, the Dark
Fathers. The Dark Fathers will be a battle to remember,
since they are as strong as all the other creatures in the
Gauntlet together and also because they have the power to
summon large numbers of undead creatures to their aid.
Now that you're all done you might ask what the point of
all this Gauntlet stuff is. Well isn't it obvious? Wealth
beyond you wildest dreams of course. Well maybe not quite
that much, but each of the Gauntlet monsters has a chance
of dropping a powerful magical
artifact in the backpack of one of its killers. These
artifacts should make it well worth your trouble to go through
all this, if you are lucky enough to get one.
Only one thing remains now and that is to leave this accursed
place. Recalling or gating is out of the question since
the evil of the place blocks that kind of magic, but luckily
there is a moongate on the beach right next to the ferry.
This moongate will take you to outside the entrance in the
corrupted forest.
Use it and you have escaped your Doom.
|