|
What do you do after you've
finished countless hours taming everything in sight from great
harts to hell hounds to get the title of Grandmaster Tamer?
Most people start another tamer ;) but I'll try and give you
people out there a guide that is based on the experience of
my tamer and several of my friends' tamers.
This document will be divided into named sections for
easier reading...
Taming Tactics
Well, you've got 100 skill points in Animal Taming, but do
you "ooOoOoOOO" every time you try and tame anything
more aggressive than a mongbat? Well, hopefully I can help
with some tactics for the "Big 4" that you can find
useful in taming other aggressive creatures :)
The White Wyrm
Right off the bat, I would recommend entering Ice Dungeon
via the T2A entrance, so you can avoid more ratmages, elementals,
etc. If you enter the dungeon from the entrance I said,
you should notice a corridor heading west and a bridge to
the south (remember this bridge). Head cautiously down the
west corridor, and watch out for snow/ice elementals and
such. The frost spiders, frost oozes and ice snakes are
all easily taken care of by an Energy Bolt or 2, just make
sure you have at least 40 mana when you get close to the
White Wyrm's lair. You'll know that you're getting close
when you see the western corridor that you're heading down
intersect a corridor that is heading up from the north.
In this corner is the wyrm's lair. Your first priority should
be to dispatch all other creatures in the area. I would
not recommend paralyze field in this area of the dungeon
because you'll run into severe terrain issues that are frustrating
(and often deadly) to say the least. Try to not get the
wyrm to target you until you have gotten rid of the rest
of the spawn. The reason I said to have at least 40 mana
is that it allows you to cast Invisibility twice. More often
than not, some ice creature will wander around you while
you're invisible and reveal you, so you need to run away
and cast Invisibility again :)
Now that you have all the creatures away from you and
the wyrm, it's time to start the taming process. Remember
the bridge I told you about earlier? Good :) Lead the wyrm
to this bridge. It is the closest and least monster-infested
area that has flat terrain that you can use for paralyze
fields. After you lead the wyrm to this bridge, the only
thing that generally spawns around you are frost oozes and
ice snakes. Again, use paralyze fields and tame away!
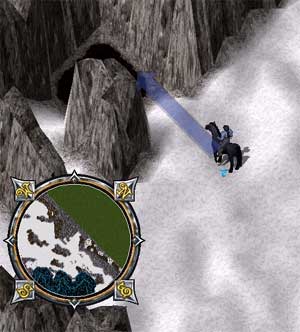
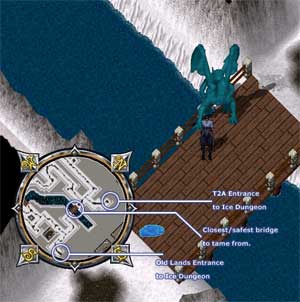
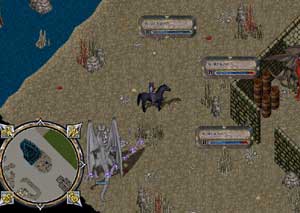
This is the T2A Entrance to Ice Dungeon that I use because
it's closer to the white wyrms than the Old Lands Entrance,
and you have less spawn to deal with on the way.
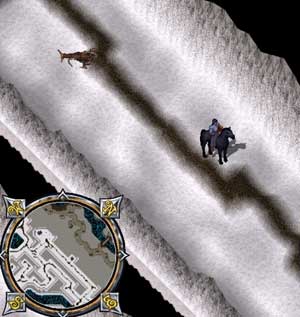
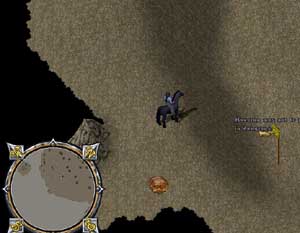
Here is the corridor leading up to the white wyrm's
lair. The west "room" on my radar is the lair,
and just off the radar, on the far east, is the T2A entrance
point.
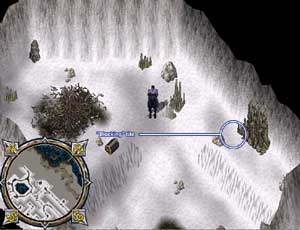
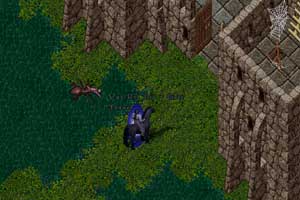
Here is the white wyrm's lair (empty at this time).
For the sake of the people that are wondering, I have
marked the location of the "blocking tile" that
you can have an invisible/hidden friend (or pet) stand
on while you're taming, so that the wyrm can't eat you
for lunch :) Please note that even though this has been
declared as "not illegal", we all know that
blocking with inanimate objects (chests, crates, etc.)
is illegal, so I wouldn't recommend using this
method, lest you get a fickle GM called on you.
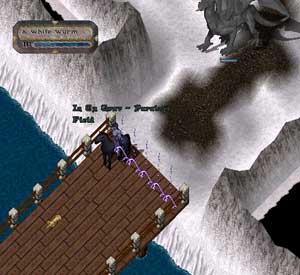
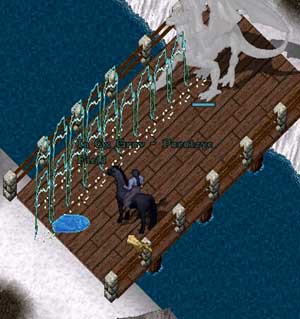
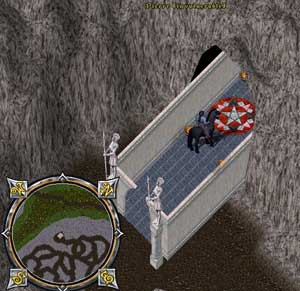
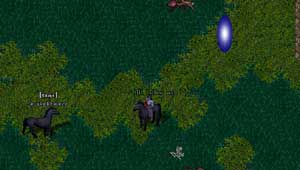
This is where the taming begins. You should lead the
wyrm to this bridge (almost directly south of the T2A
entrance) and begin para-taming.
Now you can begin taming, making sure to stay 2 tiles
away from the wyrm (a worthwhile safety precaution :).
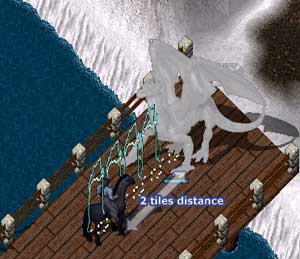
While you're taming, make use of the time that you have
while taming to "extend" your paralyze fields.
Remember, you can get in roughly 2.5 taming attempts per
paralyzation, and you get no more than 2 paralyzations
per field. Extending your fields allows you to get in
and finish that extra taming attempt without having to
run around, re-paralyze or otherwise interrupt your taming.
Please note that the cursor is perpendicular to
the direction that I want the field to face.
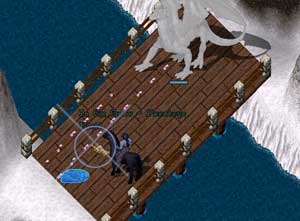
This is a set of fully "linked" paralyze fields.
Hopefully, you'll have yourself a new white wyrm pretty
quickly ;)
The Dragon & The Drake
First of all, I would not recommend going after a dragon
when you hit 93.9 skill :) I would wait until you get at
least 95 or so before attempting to tame a dragon. Granted,
some people get lucky and get a dragon on their first try
at 93.9 taming, but they fall into a very small (lucky!)
portion of the taming population. So, that aside... how
does one tame the fiery beast?! Well, that depends on where
you're going to tame and what your skills are. I'm going
to assume for all practical purposes that you're a mage
as well as a tamer because you want to gate your pets around
:) If you're a bard, that makes things even easier, but
then again, most bards already knew that ;-)
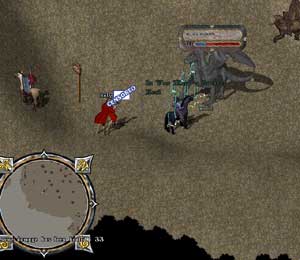
First stop: Dungeon Covetous, Level 4.
I would *not* recommend taming in here unless you're a bard
or you're a very high level tamer. A dragon and 2 drakes
are usually in this tiny area. There's not a whole lot of
room to move around if you have a dragon trying to eat you,
not to mention 2 other drakes! Most of the time there are
not a whole lot of people in here, so you'll be left in
relative peace (if that's not what you want, you'll get
it anyway :) What you should always do before entering this
level (it's the staircase to the east in the lich throne
room of the dungeon's third level) is cast Invisibility
right before you go down the stairs and have your key hovering
precariously over the "TargetSelf" macro you have
setup (you *do* have one setup, don't you?! :) As you walk
down the stairs, the instant you change screens I would
recommend casting the spell, unless you see absolutely nothing
on your screen.
After you're down there, if you're a bard, you can provoke
the 2 drakes on each other and try and tame the dragon by
yourself. If you're not a bard, I would recommend trying
to get *only* the dragon stuck in a paralyze field at the
bottom of the screen (south of the stairs) and then leading
the drakes up north of the stairs and paralyzing them there
as well. Always use Teleport liberally down here, because
if all 3 of those guys get their hands on you at once, you're
more than likely dead. Now that you have everything paralyzed,
go run and turn invisible by the dragon, preferably while
you're standing in your own paralyze field, 2 tiles away
from the dragon. What you're trying to do is get the dragon
to walk towards you while staying in the paralyze field.
The point of turning invisible was to get the dragon to
stop targeting you briefly, and to get the drakes completely
off you (hopefully they'll stay put until you've tamed your
dragon!). If you're guilded, this technique can be a bit
dangerous for you, but it can still work... what I've found
that works incredibly well while guilded is getting the
dragon to end up in the last 2 tiles of your field, so you
can stand outside of the field, and he still has room to
walk towards you while remaining in the field.
Either way, you should definitely setup a "LastSkill+WaitForTarget+LastTarget"
macro. This macro is not only incredibly helpful in general,
but it comes as a lifesaver with regard to taming.
Now you should be able to start taming the dragon :)
Keep in mind that you should always maximize your taming
attempts whenever possible. Since paralysis lasts roughly
2.5 taming attempts (sometimes less depending on how much
you "anger the beast") that means that for every
2 paralyze fields you setup, you lose 1 whole taming attempt
(this means a lot more if you have 93.9 and don't want to
spend 4 hours taming the creature :) What you should do
when you think a paralyze is about to run out, is to cast
another field on top of the dragon, plain and simple. If
there isn't enough room to "add on" to your current
paralysis, just cast one that's lined up with the dragon,
pointing the opposite direction. Always keep in mind that
paralyze fields (and fields in general) will show up as
lines that are *perpendicular* to your mouse/hand pointer
at the time of casting! Please play around with fields before
you get yourself into a tight spot, it *will* save your
life!
After you've tamed the dragon, you should either peacemake
or turn invisible, then feed the pet and gate out of there!
This is Covetous Level 4, and you'll notice that the 2 drakes
are provoked on each other ;) You should refer to the pictures
under the white wyrm section for more information on paralyze
field tactics.
Move on to Destard...
You almost want this dungeon to be camped when you get there.
With as crazy as the spawn is nowadays, you should be able
to get your very own dragon off to the side (maybe along
with a couple others, and some drakes/wyverns, too!). I
would recommend getting on the flatter surfaces that around
Destard to do paralyze-taming. These flat surfaces (which
will help them not walk right through your paralyze field
because they're on a different z-axis) are located in many
parts of the dungeon, but my 2 favorite spots are: next
to the far right (northwest) wall, still on the lower portion
of Destard Level 1, but before you get to the water elemental
area, and my other favorite is right by the dungeon entrance
next to the "No Housing" sign. Being on level
terrain, as I said earlier, helps keep monster from walking
straight through your paralyze field like it's not even
there. This can often prove fatal, which is why I recommend
level terrain. Follow the techniques listed for taming in
Covetous and you should have yourself a dragon :)
Here is the entrance to Destard, take good care to remember
where the slopes begin and end if you're taming around this
area, so that you can setup paralyze fields properly.
This is pretty close to the entrance to Destard (see
the radar map). Always remember to get yourself flat
terrain when taming with paralye fields! You'll regret
it if you don't.
Wind...
It's not even worth it... you are *severely* cramped in
all the tunnels, plus you have daemons coming at you on
one side, and liches coming after you on the other side,
not to mention the dragon you're trying to tame! If you're
going to do it, try and lead it all the way to the entrance
to Wind, where the tunnels widen up a little bit, then paralyze-tame
and teleport to get around it. Remember that now that the
townspeople will call the guards, you can't lead the dragon
into town anymore or else it will get whacked :(
If you absolutely *must* go there to tame, this is the entrance
to Wind :) Please read the UO
Stratics Traveler's Notes on the Lost City of Wind before
venturing there.
You can lead a dragon up from the southern "room"
(check radar map) and tame it in the corridors. I got
lucky this time, because these corridors are usually packed
with daemons (and other players). Please note that paralyze
field "linking" is pretty difficult to do here
due to the narrow passages but it *can* be done.

The Isle of Fire (and lots of mean things)...
This place is filled with some of the meanest creatures
in the game (including dragons, of course :) and they *all*
retarget! There is not a single monster that spawns at Fire
Isle that won't retarget on you in a heartbeat. Taming here
can be pretty decent, assuming that the rest of the area
is camped (which it usually is). Taming from the safespots
here is almost suicide. Add to that the fact that if you
die, you most likely can't get back in to get your stuff
from the safespot, and you're better of just leading a dragon
away :) One of the best ways that I've found to lead a dragon
out just using magic is by casting paralyze field, seriously
:) Everything that is coming after you should get stuck
in the field. If you then cast Magic Arrow or something
like that on the dragon (assuming he doesn't break the paralyze
himself, first) and he'll come straight after you, leaving
the other meanies stuck there. You can easily get your dragon
alone outside the temple and para-tame it. I'd recommend
getting at least half a screen away from the temple, as
people tend to lead other creatures out for different reasons
(warriors lead daemons out to train resist, other tamers
leading dragons out, etc.) Moving at least half a screen
away will reduce the chance that your taming will get interrupted.
The spawn here can get absolutely insane, so there's never
a shortage of dragons!
This is the entrance to the Daemon Temple on the Isle of
Fire. Remember it well, for it also serves as en exit ;)
You can typically get dragons (and a host of other monsters)
inside the temple itself. They do spawn outside the temple
as well, but I can almost always find one inside the temple
when I go there.

Now you can just lead the dragon outside the temple
(notice I didn't even follow my own half-screen rule?
:) and para-tame away. In case you're wondering why I
didn't start taming farther down, it's because there were
2 drakes down there that I saw when I recalled in ;)

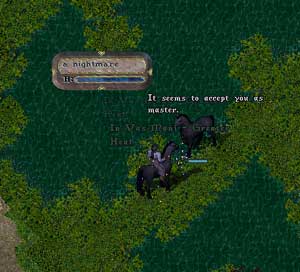
The Nightmare
Let me get this out of the way... unless you're a very good
bard/mage, do not try and tame nightmares in Trammel!!!
You *can* do it, but Felucca is much safer! Now, I'll assume
that you're in Felucca trying to tame a nightmare. The first
thing you need to do is, of course, isolate the spawn from
the nightmare. However you want to do this is up to you,
just try and isolate it on one side of the swamp :) Now
here comes the tricky part... taming the nightmare. Most
people say that paralyze-taming a nightmare is the best
way to do it, but I would have to disagree... I think that
leading-taming is the best way to get a nightmare. NOTE:
I would not recommend this if you don't have a decently
fast connection and are riding a mount when you're down
there. The reason that I think that lead-taming is better
is simply because you save reagents, and it actually becomes
easier than paralyze-taming once you get used to it. The
idea is to lead the nightmare around in large square patterns
so that you can tame and avoid getting hit. This stops the
nightmare from firebreathing because you haven't attacked
it, and it hasn't touched you. Just keep walking and taming,
using whatever macros are necessary. You can always paralyze-tame
(not paralyze-field in Felucca!)
If you absolutely *have* to tame a nightmare in Trammel,
I would recommend trying to do 1 of 2 things: paralyze the
nightmare and lead the spawn away, or setup a paralyze field
for the spawn and then cast Magic Arrow on the nightmare
so that it will follow you. There are a couple of places
you can lead the nightmare that I would recommend. First,
you can lead the nightmare to the small swampy room to the
northeast of the "Hell" area. The reason I say
this is because the swamp terrain is flat, and so you can
use paralyze field more effectively. The other place that
I would recommend is, of course, the main swamp area because
it's all flat. Most people also want to know things like:
what to bring, what to do, how to avoid dying, etc. I would
recommend bringing at least 20 each of Nightshade and Bloodmoss
because you will be casting Invisibility a lot :) If you're
a bard, you already know the value of Peacemaking, and it
becomes that much more evident when you're down in "Hell".
Always have Invisibility precast and have your finger hovering
over your "TargetSelf" macro :) Again, I would
never advise taming a nightmare in Trammel unless you simply
want to see if you can do it :)
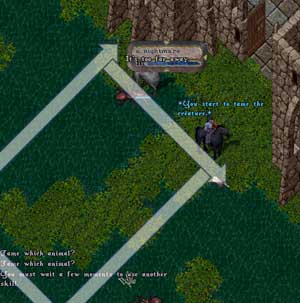
You can lead-tame anywhere, but I would definitely recommend
a nice, big pattern to follow. A larger, looser pattern
(as opposed to a cramped, tight pattern) gives you the opportunity
to get off a much needed Greater Heal, Energy Bolt (for
those pesky drones) or any other spell you need, while still
allowing you to tame! (Yes, I know that the "square"
is partially cut out of the image, but you get the idea
:)
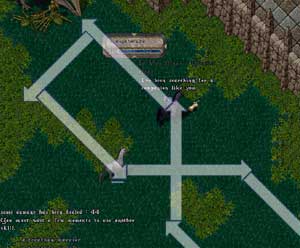
An alternative to "square" lead-taming, is
the figure-8, which allows for more flexibility when a
sudden monster spawn occurs, you need to move areas, etc.
The largest benefit of the figure-8 is that it allows
you to effectively move your taming square from one area
to another in a quick manner, without interrupting your
taming. (Yes, I know that the "figure-8" is
partially cut out of the image, but you get the idea :)
If you're doing this in Felucca (which I certainly do),
remember that after you've tamed the nightmare to immediately
peacemake and/or turn invisible. If the nightmare is attacking
another player when you tame it, try and turn that player
and the nightmare invisible.
After the nightmare is tamed, if you must gate it out,
try and cast gate in this immediate area of the Keep.
The reason that I say this, for those of you that haven't
found this one out the hard way, is that you can't gate
much farther (in any direction except north) than this
spot. This also applies to marking runes in the keep,
even though the marking rules seem to allow more flexibility
than the gating rules (which also apply to moongates,
for those of you that were trying to get around it :)
I always tell my fresh nightmare to "stay" and
then turn it invisible while I'm casting a gate. This
prevents it from getting involved in combat with something
nasty like an avenger or 3.
Call your new nightmare and dash for the gate!
How to Deal With Annoying Creatures That Rudely Try
to Kill You When You're Taming
~Giant Ice Serpents: basically a giant serpent that can
also give you a glacial staff as loot! A heavy spell combo
of Explosion+Energy Bolt+Explosion+Whatever should be able
to kill them (or one Blade Spirit :) You can also whack
at them pretty easily if you're a warrior without too much
worry...
~Snow Elementals: I cannot even begin to describe the
extent of my hatred for these arctic speed demons *stomps
feet*. But I've found that paralysis and Blade Spirits work
rather well. If you're more into steel than spells, I'd
recommend A) Shooting it from afar with a bow, B) Having
high parrying or C) Use a *mean* two-handed weapon and do
"drive-bys" on it. For any of these 3 options
I'd defnitely recommend total refresh potions. Or if you're
a bard... well, you know what to do if you're a bard ;)
~Ice Elementals: A nice Explosion+Energy Bolt+Explosion
combination usually works like a charm, but if you're going
to be going hand-to-hand with it, I'd recommend some decent
resist. Even though these guys are generally pushovers,
they have been known to unleash some *ugly* spell combos.
Who'd have thought that a block of ice could do that...?
~Frost Spiders: Extremely quick arachnids that are surprisingly
good at interrupting your spells (oh wait, I have 0 Wrestling...
nevermind :). Either kill them outright with an Explosion
or 2, or slow them down with an Energy Bolt and then tame
them (better that they're for you than against you, right?)
~Ice Snakes: These are typically Kill-On-Sight to me because
they're generally very hard to target and/or drag their
lifebar up. An Explosion usually takes care of them.
~Frost Oozes: A single Lightning Bolt. These are hardly
worth mentioning. I've actually spent 5 minutes taming a
white wyrm and didn't even notice that an ooze was attacking
me the whole time until the wyrm killed it (I was sleepy
and I had promised a friend I would tame one for him :)
~Frost Trolls: These are almost like Snow Elementals except
for the fact that they're slower :) Again, paralysis and
Blade Spirits work *wonders*. To actually go toe-to-toe
with them is a waste of taming time for me... They're stupid
enough that you can usually paralyze them and lead the white
wyrm off and they'll forget about you.
~Ice Fiends: You should only run into these if someone
has led them away from where they spawn, in which case I'd
paralyze the wyrm and lead the ice fiend away to where it's
supposed to be (northwest of the white wyrm spawn, right
before the entrance to the Ice Fiend Room). Ice Fiends are
quick enough that you shouldn't have a problem with the
wyrm becoming unparalyzed before you're off the screen.
After you've led it back, I'd highly recommend running into
the Ice Fiend Room (which is usually camped), and then recalling
back to the white wyrm. If you absolutely must kill these
guys, I'd recommend that you have A) Plenty of resist if
you're a warrior, B) Master Meditation/Magery if you're
going to use spells (Evaluating Intelligence helps here
as well) or C) An evil snow elemental to provoke it onto
if you're bard (you should always kill snow elementals if
you have the chance :)
~Arctic Ogre Lords: I'd be very surprised to see one of
these guys by the white wyrm spawn, since that would mean
that someone would have led one almost all the way across
the dungeon. In any case, a quick Paralyze and 3 Blade Spirits
will kill them, but if you're just interested in taming
the wyrm, I'd say that you'd be better off just paralyzing
them and running off somewhere else with the white wyrm.
~Ratmen: Everyone knows you can drop a normal ratman in
a heartbeat, but the ratmen mages are significantly tougher
than their mundane kin. I typically just paralyze them and
walk away, but you should be able to drop them pretty quickly
with a heavy spell combo (Explosion+Energy Bolt+Explosion+Energy
Bolt+Poison comes to mind) or with a little bit of effort
from almost any weapon, provided that you have the magic
resistance to back up your blade (or whatever you use).
The mages can pack a punch with their spells, just like
ice elementals, so beware.
~Drakes: These are the most stubborn and relentless of
the target-switchers in my opinion, and I'd say that as
standard fare, Paralyze and Blade Spirits work wonders.
As far as being a warrior is concerned, they're pretty easy
to kill if you have decent healing and good fighting skills,
just watch out for any other monsters (like that dragon
you want to tame) that might try to eat you while you're
fighting.
~Wyverns: As a general practice, I just paralyze these
guys and leave them. They're outlandishly quick, and the
deadly poison makes them that much less desirable to be
around. Even though they're very easy for a Blade Spirits
or a provoked dragon to kill, I wouldn't recommend close-range
combat with these guys.
~Giant Serpents: More of an annoyance than a real threat
most of the time, I just kill them outright with a few well-placed
spells (or one well-placed Blade Spirit :)
~Water Elementals: In my opinion, these are the weakest
of the spell-slinging elementals. They are easily dispatched
with a heavy spell combo, or a few good hits from a halberd
of vanquishing ;)
~Daemons: If you're getting harassed by these on your
way to tame something, you're obviously in Wind or Fire
Isle. I'd recommend recalling immediately to Destard or
Covetous and taming there :) Just kidding... If you're in
Wind, there's really not much escaping combat with these
guys unless someone else happens to foolishly run by and
they retarget. Your best bet would be to A) hop off your
nightmare/unicorn/kirin if you have one and let them kill
it, B) lead it up to the marble stairs and let it get guard-whacked,
or C) Beating it down the old-fashioned way. If you chose
C, you'll be there for a little while. These daemons aren't
exactly pushovers, and they respawn like mad in Wind. I'd
say that you're better off just trying to paralyze them
and let the dragon walk around them to get to you, so that
you can walk off-screen with the dragon, and hopefully the
daemons will have forgotten about you. If you're on Fire
Isle, you really have no choice but to paralyze them and
leave them, because the spawn can get so out-of-control
there.
~Liches: The objective here is to kill quickly and without
mercy. These undead are capable of unleashing some nasty
spell combos (Flamestrike+Flamestrike+Flam-ooOooOOOo is
a classic favorite) so killing them quickly with an Explosion+Explosion+Energy
Bolt+Whatever you want or a silver weapon (or even a nice
mount :) is favorable to having a long battle with them.
With most tamer templates lacking magic resistance, these
fights usually aren't pretty.
~Terathan Drones: annoying and very good at interrupting
my spells, but an Energy Bolt or 2 usually does the trick.
~Terathan Warriors: These guys can really hurt when they
hit, and they move pretty quickly on top of that. As I've
said before, Blade Spirits is probably the best way to go
on these, unless you're a warrior, then killing them outright
is always an option. Using damaging spells against them
becomes a waste of mana because it will take quite a bit
of mana to kill them, and then you're left with half a dozen
other angry terathans bearing down on you.
~Terathan Matriarchs: I'd just stay away from these, plain
and simple. They don't seem to spawn all that often in the
swamp, but they do spawn. I'd say that if you're a bard,
you can easily take care of them, but otherwise I'd stick
to your taming business and get out of there.
~Terathan Avengers: The worst of the bunch as far as damage
goes; they hurt when they hit and have deadly poison to
top it off (not to mention a hefty arsenal of spells at
their disposal). I'd say that you should only try and kill
these A) if you absolutely have to and B) only if you're
a bard or a mage. Trying to get the avenger mana-drained
should be a top priority, then you can let Blade Spirits
take care of the rest...
~Ophidian Enforcers, Warriors, Avengers and Knight-Errants:
these are the melee force behind the ophidians, listed in
ascending order of strength. The avengers and knight-errants
are especially mean because of their deadly poison capabilities.
As usual, paralysis and Blade Spirits (you may have to do
2 or 3 to kill an Avenger or Knight-Errant) do the trick.
~Ophidian Apprentice Mages, Shamans, Zealots, Justicars
and Matriarchs: these are the magic-users of the ophidians,
listed in ascending order of magical power. The justicars
and zealots are especially nasty because they can hit hard
and move *incredibly* fast in addition to their magical
prowess. I wouldn't recommend fighting any of these guys
because it means that you're probably down in the bowels
of "Hell" and should be more worried about not
dying than killing some snakes :) A few paralyze fields
can hold whole families of these at a time (without them
casting on you!).
This list is meant to cover all the creatures that you
can encounter while taming the white wyrm, dragon and nightmare,
respectively.
-General Taming Q&A-
Q: I didn't attack the creature, why is the wyrm/dragon/nightmare/drake
still breathing and/or casting on me?
A: A lot of times, these creatures will naturally do this,
but it's best not to retaliate. Don't provoke creatures
onto the desired tamable, because it will still see it as
you "attacking" it. Additionally, instead of having
Reactive Armor or Magic Reflection up, cast Protection and
Arch Protection. Both Reactive Armor and Magic Reflect act
as you "damaging" the creature, so they will continue
to cast/breathe on you. Protection+Arch Protection not only
decreases the chances of getting a crucial healing or protective
spell of, but it can also substantially increase your AR.
Q: Where can I find a safespot to tame <creature type>?
A: I don't know. I've never used safespots, stacking, blocking
or any other tactics like this to tame. A lot of people
that I've seen that use safespots unfortunately get hit
by Murphy's Law and lag out while the dragon is breathing
on them and die in the "safespot"... *chuckles*
Stacking is flat out lame and possibly also bannable(?)
and from what I've heard about blocking (aside from box
blocking which is obviously bannable), I'm not willing to
risk my account because of the whim of some GM. That and
I usually don't have any extra help when I go taming, so
I couldn't block anyway :)
Q: How is this blasted &#$! able to walk through my paralyze
field?! or Why doesn't this thing stay still?!
A: There are a few answers to this question, the first of
which only applies to paralyze fields. Now, if the creatures
are on a different z-axis, the spell will not affect them.
Why not? I don't know... it *is* a wall, after all. Suffice
to say it just doesn't work and they will appear to walk
"through" the wall. What you should do is try
and lead the creature to a flatter area (you'll get to know
these areas pretty well :) Now for the other answer to the
question. The bottom line is usually that the creature is
being damaged, period. Whether it is from a provoked creature
that is on it, a poison spell or other poisonous effect
on the creature, direct damage from a spell/creature or
even from a magic arrow that it cast on itself (dragons
have a nasty, and sometimes fatal, habit of doing this).
You should be standing at least 2 tiles away from the creature
you're trying to tame at all times because of issues like
this. More than likely the creature is going to be flagged
on you, then if it gets released somehow it will come after
you. It usually doesn't matter how it gets released; be
it a warrior "trying to raise parrying" (yes,
I've gotten that one before on a white wyrm) or simply the
creature releasing itself (I have only seen this happen
with dragons), the 2 tiles will give you a little head start
to avoid getting all beat up :)
Q: Why don't you say how to raise taming or any of the
other taming-related skills?
A: Because it's all answered quite nicely in the FAQ that's
locked at the top of the forum, as well as in the
website for the Pacific Rangers' Council.
Q: What should I bring with me when I tame big, mean stuff?
A: Well, I would say that it always depends on where you're
going, but as a good rule of thumb, I typically take up
to 50 of each reagent, about 5 raw ribs and any other "essentials".
I would consider essentials to be anything that you need
to use your other skills that could possibly help you survive.
For example, a bard would need an instrument to peacemake
and/or provoke, while a treasure hunter wouldn't need to
bring lockpicks, because they couldn't possibly help him/her
survive a taming adventure gone south. As always, only take
that which you can afford to lose!
Q: Do I *have* to take up barding skills to tame <creature>?
A: Absolutely not (but it does help out a lot! :). There
are several different methods that I would use if you're
not a bard. As a matter of fact, I use these methods most
of the time because they are less time-consuming than the
barding methods. I'm blindly assuming that your tamer has
at least enough magery to cast Gate Travel from a scroll,
which means that you hopefully have enough skill to cast
other helpful spells like Paralyze Field and and Blade Spirits.
It's usually simple enough to throw down a Paralyze Field
behind you and get everything that's following you trapped
in it. It's highly advisable to "trap" all the
other monsters a generously healthy distance from where
you want to tame your beast. For example, if you're going
to tame a dragon in Covetous, I'd say to trap the 2 drakes
on either the north or south side of the "room"
and tame the dragon on the extreme other side. Even though
it's cramped in there, it gives you enough room to maneuver
around while taming, without letting the drakes see you.
On the other hand, if you have a pesky drake or wyvern or
whatever that just won't leave you alone, leave your tamable
paralyzed and cast Blade Spirit on the offending monster.
This spell works extremely well against drakes, wyverns,
terathan drones, terathan warriors, terathan avengers that
have been mana-drained *grins*, snow elementals, frost trolls
and a host of other annoyances that are trying to keep you
from taming your precious pet-to-be. If there are just too
many of them to kill, that's when we come back to the "spiderweb"
scenario where you have *everything* all nice and stuck
in a paralyze field. Go ahead and cast something small (like
Magic Missle) on whichever creature you'd like to tame and
*voila* the paralysis is broken! You can now hopefully lead
your desired creature away to tame in peace!
Training Tactics
So you just got your brand new pet and you can't wait, huh?
Well... a few things you should take heed of before you go...
1.) I would not recommend hunting with a pet unless you have
at least 90% of the taming/lore skill required to tame it!
This means that you should not try and take a dragon with
you at 75/75! This means that you should wait until you're
about 85/85 so you have somewhat decent control over it and
don't have to take 100 ribs with you just so you can keep
your ornery pet happy while you hunt! It would just as soon
have you for lunch as whatever you were trying to order it
to kill!
2.) Bring a few ribs along for the ride. I would say 5 or
so should be sufficient.
3.) Bring about 100 bandages or so and about 50 of each reagent.
This should be sufficient to easily sustain you and your pet
until you have to bank, anyway.
4.) If you're not using bandages to heal your pet, you'll
be wasting a lot more reagents, so bring 150 or so of each
:)
*Note: please remember (especially if you're hunting in
Felucca), to never bring more along with you than you can
afford to lose!
People often wonder if there is some "magical"
creature that will almost instantly max out your pets� skills
and stats. The simple answer is a definite no :) There are
ways that you can train your pets, however, and I'll list
some of the more popular ones below.
Blood Elementals: a long-time favorite of a *lot* of people.
Any of the big four (even a drake) can take these guys solo
with some good healing/curing going on (especially the drake).
The reason it seems that people like these so much is that
they usually spawn by themselves, or with just a couple
of other relatively weak creatures and they can give awesome
loot, fame/karma, magic items, etc. They'll also do wonders
for your pet training efforts. I would recommend at least
70ish veterinary before fighting them because at lower levels,
you can get your pet (and yourself) into a whole lot of
trouble by failing more than a couple bandages in a row
(especially if other things are spawning).
Cyclopean Warriors / Titans: These pretty much go hand
in hand because they usually spawn in the same place together
(T2A Titan Valley / Despise Level 2). These guys are great
for working your pets up on, mostly because there usually
isn't anyone else camping the spawn and you'll be left in
relative peace to train your pets. There's nothing in Titan
Valley that a big pet (with maybe the exception of a fresh
drake) can't handle with some decent healing. It's a great
place for beginning veterinarians (50ish) to practice their
skills, while still getting some decent money, etc. You
can also kill stone gargoyles if you're hunting Titans in
the Valley, which can make you a pretty penny if you sell
the pickaxes :)
Daemons: Hythloth or Wind, you can almost always find
a tamer there killing some time and a few daemons. These
are fun places in general to hunt, because multiple, multiple
daemons can provide more of a challenge to the tamer than
most of the other typical hunting spots. You can get away
with mediocre veterinary skills (60ish) if you are hunting
in Hythloth, but if you're hunting in Wind, I would recommend
expert veterinary skills (80ish) because sometimes the spawn
can get pretty out of hand (not to mention the fact that
a dragon could attack your pet as well as a whole slew of
daemons/drakes). Just make sure that you don't run around
these guys because they'll retarget you incredibly quickly
:)
Ice Fiends: Almost always camped, and with good reason!
These guys are reasonably easy to kill compared to the kind
of loot and skill they can give you and your pets! You won't
be able to use veterinary while your pet is fighting because
of the fiends' cold aura, but you should still have sufficient
time between spawns to heal up your pet. Just make sure
that you don't run around these guys either, because they
seem to retarget even faster than daemons :)
Elder Gazers: Check out the passage area between Shame
Level 3 and Shame Level 4 (it's the Elder Gazer room). In
case you'd never seen an elder gazer before, that's what
one looks like. Now leave that area and find somewhere else
to kill them (Shame Level 4, Covetous Level 2, Ilshenar
Elder Gazer Village) because that area is always camped
by [guarded] 70/70 twinks. Yes, I'm making a generalization
based on what I've seen on my shard alone, but more often
than not, this is what I've heard from other people across
different shards, so I seriously doubt that it's just me
:)
These are some of the most popular areas to train up pets
that I've seen, and I'm sure that there are plenty more.
I just thought that I'd list off some of the places I had
typically seen people training (myself included :)
Keep in mind that the reason this training section is
so short is because training is really just "fighting"
with your pets, and that's covered in the next section :)
Fighting Tactics
-Player vs. Monster(s)-
The best thing that I've found to do is to make sure that
you have enough skill to decently control your pet! I can't
remember the number of times I've seen people lose pets in
the middle of a dungeon/big fight because of control issues!
I would recommend no less than 90% of the minimum skill required
to tame the creature to have decent control. I know that you
can say "79% control at 70/100" isn't bad!",
but it is :) Trust me on this one. You can thank me later
;)
In general, I always like to have Invisibility precast,
with my finger sitting right on top of my "TargetSelf"
macro key for good measure. This is not so that I can hide
and let my pet get auto-attacked while I stay invisible.
This is a precautionary measure that I've learned from many
treasure hunts (surprisingly enough I haven't been on a
level 5 yet) and fishing nets, as well as many days spent
as a tank mage in the Cove Orc Fort just having a good time
:) After you've turned invisible I would recommend trying
to get your pet to attack *everything* you see, but definitely
go after the creature that you want dead first, last. In
other words, if there is one blood elemental and one earth
elemental, and you want the blood dead first, attack the
earth with your pet, and then the blood. That's a stupid
tactic, in my opinion, but that was just an example.
As far as hunting goes, it's good to get a feeling for
when your pet's mana pool (if any) runs out. This will help
you determine how long fights are going to take. It's really
amazing sometimes how much a difference a white wyrm's mana
pool makes :) At this point, you can help out with some
supplementary spells, attacks, etc. and you can keep bandaging
all the time because you shouldn't be taking any damage.
When you're up against multiple creatures, do *not* go
after the stronger ones first unless the advantage that
the monster has is almost purely magical. Let me give some
examples...
Example #1:
You're out hunting in Shame and you have 2 dull coppers,
4 earth elementals and 1 blood elemental that spawn right
around you and your pet. Your first priority should be turning
yourself invisible and getting the creatures' lifebars for
easier targeting. The first creature you should order your
pet to attack in this situation *should* be the blood elemental!
Then I would go after the earths, and finally target the
dull coppers. The reasoning behind this is that the damage
that the blood elemental is going to do, is going to be
relatively the same over time, and it will take a while
to kill it. The other elementals are individually weak,
but when grouped up like that, can make a huge difference
in the amount of damage that your pet is taking, not to
mention interrupted attacks, etc. That's why you always
want to go after the weakest or most annoying creatures
first. Dull copper elementals are annoying because they
explode when they die, doing damage to you, which makes
using bandage more difficult until they're all dead. Scorpions
are annoying because they constantly poison your pets, which
delays any healing they might need to be receiving from
you. Snow elementals are annoying because their cold aura
prevents you from using bandages on your pet. See what I'm
saying? Get rid of whatever can cause *you* the most trouble
when trying to aid your pets.
Example #2:
1 red npc mage (blue-robed), 1 kraken 3 air elementals.
Go for the mage first! Remember what I said about "purely
magical" before? This is the category that mages, liche
lords, etc. fall in. They can do a crazy amount of damage
with their spells, but they're physically weak compared
to your pets, and don't have as many hit points as some
of the other creatures that your pet is up against. In the
above scenario, I would kill the mage first and start working
on the air elementals. I would also be casting Blade Spirits
on the kraken at the same time. Don't ever be afraid to
help out your pet with whatever you have available to you.
A tactic that I use all the time is provoking something
else onto the creature that I want to kill, providing less
damage to both my pets and to myself, which saves reagents,
bandages and trips to the healers :)
Now most people are curious as to how to fight certain
types of creatures with their pets, and what methods work
best. I'll try and cover as much as I've tested and experienced
here.
Against "physical" creatures:
Creatures that fall into this category include any and all
creatures that rely on incredibly heavy physical damage
to kill their enemy. This would include ogre lords, arctic
ogre lords, frost trolls, ophidian warriors, etc.
Your best bet is to either A) provoke something else onto
them first, or B) cast Blade Spirits on them before your
pet goes after it. A way to make sure that your pet doesn't
attack is to do some minor "scouting" before you
go somewhere else. All you have to do is tell your pet(s)
to "stay" and walk about a screen away (with them
at the bottom of the screen). All you have to do is repeat
this process and you should never really run into problems
with these kind of creatures. All the but the strongest
of this group (ogre lords) will fall to a single big pet.
Against "magical" creatures:
Get a wand of mana draining, or a weapon of mage's bane,
or anything else to steal their mana. Another option, if
your veterinary is good enough, and depending upon which
pet you're using, is just to heal them with magic and bandages
through the monster's mana dump and then just let it go.
More often than not, these kind of creatures will not be
able to finish their mana dump because they'll already be
dead to a larger pet :) I personally like to get my pet
engaged, cast a couple of Mana Drain spells, followed by
an Invisibility and a Tab-out of combat (to prevent auto-attacking).
I then walk up and start using bandages and the rest of
it's cake from there.
Against "hordes" of creatures:
These include any creature type that has the possibility
to "horde" or "gang up" on a pet/player.
The most common examples are orcs and ettins (especially
at the Cove Orc Fort). There are a couple of things that
you can do (if you're not guilded), to help your pet out.
The first technique just involves a lot of walls :) Cast
Poison Field and Fire Field over and over again. Most creatures
should try and get away from the field(s), rather than just
stand in them. This should buy you (and your pet) some time
to get in a few more hits/heals that might have been interrupted,
or otherwise made impossible. Technique 2 involves the big
"area" spells... Chain Lightning and Meteor Storm.
These spells, combined with a Poison Field can be extraordinarily
deadly to "horde" creatures (especially orcs :)
Against "super" creatures:
These include creatures that are damned near impossible
(if not impossible) to kill with a single pet. These guys
would include Balrons, Ancient Wyrms & Shadow Wyrms, most
notably. These creatures should not be fought unless you
just want to kill them. The loot they give is not all that
great when you look at the risk involved, in my opinion.
But if you absolutely *have* to do it, I can tell you a
couple of ways that I've found. Unfortunately, most of these
ways also mean that you're a bard, so this subsection will
be somewhat slanted towards bards. For those of you who
are not bards, and just want to kill these guys, I would
recommend 4 dragons :) Seriously... there's not a whole
lot in this game that can't be killed by 4 dragons at once
*cough*damn tentacles*cough*. That's the best way that I've
found to kill a Balron, Ancient Wyrm or Shadow Wyrm. Doing
it with fewer pets takes quite a bit of luck, and I would
only recommend it if you have high Magery, Meditation and
Veterinary skills. You'll need every last hit point that
you can squeeze out of those heals. At a bare minimum, I
would recommend 2 dragons (wyrms do nicely as well) for
any of these creatures.
Against "retargeting" creatures:
Stay as still as possible! The less that you move, the more
likely you are not to get targeted on. I would highly recommend
reading Xiombarg's
Peacemaking & Provocation FAQ v1.0 to get an idea of
how to get around and deal with retargeting monsters. The
best thing that I've found to do is just to get them before
they get you. Have your pet attack them the instant that
you see them, if possible. If you can, just turn invisible
and then immediately issue your "kill" command.
To get up to your pet without being retargeted, I would
recommend one of 3 things. First, you can walk *slowly*
up to your pet. I would say taking a step every couple of
seconds should work, as long as you don't attempt to run.
Running will get you retargeted almost 100% of the time.
The second thing that you can do is to teleport next to
your pet. I usually do a teleport+invisibility combo that
works very well so that I can use bandages without having
whatever monster my pet is attacking retarget on me. The
last technique (and my personal favorite if the spawn/terrain
allows it) should be used only by tamers that have good
control over their pets. By "good control", I
would recommend having at least 90% or so control over your
pet before attempting this technique. This technique does
not involve you going to your pet, it makes your pet come
to you. All you have to do is issue the "all follow
me" command a few times after your pet is engaged in
combat. By saying "a few times" I do not mean
that you should spam the command. I mean that you should
issue the command and then see how far your pet comes to
you before it turns around and continues combat, and then
re-issue the command until your pet is next to you so that
you can bandage it.
Against "aura" creatures:
I hate these kind of creatures because it typically means
that I can't use bandages on my pet to heal it. I would
recommend not getting into these kind of fights with large
amounts of spawn, because sometimes magery simply isn't
enough. If this starts happening, look ahead. Try and get
your pet to attack the largest "aura" creature
first. Then proceed to try and pick off the other "aura"
creatures one by one using either offensive spells or Blade
Spirits/Energy Vortexes. When fighting against "aura"
creatures, still follow general rules for dispatching creatures.
For example, you should kill an ice elemental before you
try and kill a snow elemental. While your pet is killing
the ice elemental, you can start casting Blade Spirits on
the snow elemental, which should drop it in no time. Then
when there are no more "aura" monsters left, you
can use bandages to heal your pet more easily. Against incredibly
large numbers of "aura" monsters, one of the best
things I've found to do if you're not a bard (otherwise
just provoke them) is to either summon a daemon or blade
spirits to take care of the non-magical enemies that could
be interrupting your pet. You may also want to cast Bless
and Arch Protection on your pet to give it a little bit
of help. Also, don't be afraid to use yourself as a decoy.
Cast paralyze field somewhere about half a screen sway from
your pet(s). Make sure you have a trapped pouch if you're
guilded or in Felucca, and then purposefully get in the
aura of a few of the creatures so that they'll come after
you. Get them paralyzed (which will hopefully last 20 seconds
or) and that should alleviate some of the stress on your
pet. There are also some of the status-affecting spells
that can make a huge difference... Mass Curse comes to mind...
-Player/Pet vs. Player(s)-
I personally don't like taking my tamer over to Felucca
because every time that I've been there in the past couple
of months, I seem to have a huge sign over my head that
says "Please kill me and my pets for no reason other
than the fact that I'm a tamer". Aside from that, there
are very few (if any) 1 on 1 battles that a tamer should
lose. A tamer is capable of dishing out more damage over
time than any other class/hybrid template. As a general
rule, you shouldn't just cast paralyze and spam "all
kill" over and over again (well, "all kill"
doesn't work anymore, but you get the picture). What you
should be thinking about doing is getting rid of any magic
reflect, if they have it up. Harm is a great spell for doing
this that comes to mind. It uses up very little mana (almost
negligible) and will get a magic reflect down if it's up.
The second thing you should be thinking about is paralyzing
them so that you can get your pet on them. It's very easy
to setup a "LastTarget" macro so that you can
continually paralyze them while your pet chews on them.
There are some better tactics you can use against certain
character types and I shall list some of these below. By
no means am I a PvP guru, but these are some things that
I've used that worked, and hopefully you'll find them useful.
Against a melee warrior:
It's pretty easy to just paralyze them until they run out
of trapped pouches, and most hardcore warriors won't have
enough mana to cast magic trap over and over again in between
paralyzes. Now all you have to do is tell your pet to kill
them and precast paralyze :) When you first encounter them,
they'll usually try and strike fast and furious. This is
typical, and you should just run away enough to get your
pet after them. If your pet is in guard mode, it will automatically
attack them for you while you run to heal/paralyze/etc.
There are several types of melee warriors, and different
tactics for dealing with each of them.
1.) The Axer:
In my opinion, possibly the deadliest of the melee warriors
against a tamer, since a couple of good hits can mean death
for you. Against these guys I would recommend trying the
typical harm, paralyze, "all kill", but on top
of that I would recommend casting poison and curse. It's
a well-known fact that axes have a lower hit rate than a
lot of other weapons, so why not help them miss even more?
;) The poison aka "The Great Annoyer" prevents
them from healing damage that your pets and/or spells are
doing to them for 18 seconds, and if they do bother to drink
a cure potion to get rid of the poison, that means that
they have to disarm their axe and they can't be hitting
you (a very good thing). Another very interesting tactic
to use against axers is curse/agility/mindblast. This will
lower their stats and then increase their dexterity without
increasing their stamina, so they still swing slower, but
it makes the mindblast more effective because it will spread
out their stats more. Most axers tend to cut right through
reactive armor spells, so protection is recommended because
that will decrease the chance to have a spell interrupted.
Arch Protection is also helpful in adding to your AR, which
means that they have a lower chance to hit you, etc. For
more information on protective spells, etc. please look
at the information in the Mage
Forum FAQ.
2.) The Spear Dexer:
A royal pain because of the paralyzing blow. Reactive Armor
is awesome against these guys, and if you're also a bard,
you can try and peacemake them while running to prevent
them from auto-hitting you when they get close. If they
do happen to paralyze you, drop an invisibility item on
yourself, but make sure that you're tabbed out of combat
first so that you don't auto-defend. If I'm not mistaken,
you can also use teleportation items to give yourself an
edge while paralyzed, making them run after you until your
paralysis wears off :) Other than that, just follow general
tactics for PvPing against a melee warrior in addition to
any other tactics you like.
3.) The One-Handed Poison Dexer:
These guys can be extremely deadly because of their ability
to continue hitting you while they drink potions for curing/healing/etc.
One of the best things that you can do is attempt to paralyze
them from the beginning of the fight and then just have
your pet eat them while you run around casting more spells
at them. If these guys do hit you, don't panic. Drink a
cure potion or cast cure on yourself and you should be fine.
You might need some healing, but keep in mind that the deadlier
the poison, the less often it "hits" you, giving
you ample time to pull off a cure, etc.
4.) The Macer:
Don't let these guys hit you! It's not so much about the
damage as it is the stamina drain. I always keep a couple
of ribs and total refresh potion on me so that I can get
my stamina back in a pinch if I need to. Other than dealing
with stamina drain, they're not a whole lot different from
other warriors.
5.) The Archer:
These guys are notorious for missing, but maybe not quite
as much as the axer :) Just have your pet attack and then
turn invisible or peacemake, etc. Just do something to get
them off you! You can also cast clumsy for lowered attack
speed in addition to casting protection and arch protection
on yourself. Reactive Armor is absolutely worthless against
archers, so don't even bother. Archers can actually be easier
in some situations than a melee fighter due to the fact
that they *must* stop to shoot at you! This makes them more
vulnerable to you and your pets :)
That's about it for the warrior. The main rule of thumb
is just to usually poison and/or paralyze them while your
pet is chomping away :)
Against a mage:
Hopefully you have magic reflection cast, and if not, cast
it as soon as possible! If you have a wand of mana draining,
I would recommend using this as well to try and destroy
their mana pool. One of the best things to do would be to
immediately cast curse on your opponent, because this will
have the effect of not only decreasing their mana pool,
but also decrease the rate at which they can regenerate
mana. After a harm/curse (use harm to get rid of magic reflection
first) I would recommend casting poison on them. Try and
stay more than 2 tiles away from them as this will hit them
with a lesser poison (unless they resist it), which can
interrupt spells a whole lot better than greater or deadly
poison, because it hits more often. If they're resisting
your poison spell, try and cast spells that can't be resisted,
like clumsy, weakness and feeblemind. There are others out
there, but I mentioned those because they are the fastest
spells in the game, can't be resisted and it will interrupt
their spells as well :)
While you're busy interrupting their spells, your pet
should hopefully be chewing right through them and they
should drop in no time. Mostly I'd watch out for paralysis,
because this will stop your pet dead in its tracks and will
leave you in a magery competition against your opponent.
This battle will almost always end up in favor of the pure
mage, because they have stronger skills at their disposal.
When they paralyze your pets, that can leave up to 300 of
your skill points "unavailable" for the remainder
of the battle. One of the things that I would recommend
doing (especially if you have peacemaking or provocation),
is to cast magic arrow or harm on your pet to release it.
This takes a lot less mana than paralyze to use, and if
you have musical skills you can always peacemake and re-issue
the command. Hopefully the mage's spells will be getting
interrupted too often to be able to paralyze your pet, but
it's always best to have a backup plan :)
Against a tamer:
Usually the tamer is just a weaker mage (once you take away
their pets), so you can use a lot of the same tactics. Always
keep in mind that you should try and kill the tamer first
and foremost! Without a master, the pet is just another
monster. There's not a whole lot to say about this kind
of battle, other than the obvious... You should attempt
to keep their pet(s) immobilized, as well as the tamer.
Take the tamer out first and the rest should be easy.
Against a gank:
Usually a tamer gank will be a group of mages attempting
to separate the pet and the master, to make for an easier
battle. In all situations, it's advisable to have an invisibility
item. A good way to prevent ganks is to actually release
your pet (dragon & white wyrms usually) because that will
allow the pet to auto-dispel blade spirits and energy vortexes.
Honestly, the best strategy is to attempt to gate your pet
out to somewhere safe, because if a group of mages comes
after you just because you're a tamer, more than likely
they know what they're doing and it's not worth losing a
pet over. But if you're going to try it anyway, I'd recommend
putting your pet on one of the mages and then releasing
it. I'd then turn invisible if possible, providing heals
to your pet and magical interruptions and distraction to
the other mages. A favorite tactics of mine is to paralyze
them, cast energy vortex and then provoke as necessary.
Dispel always seems to take an awful long time to cast when
you have a dragon and an energy vortex trying to eat you
for lunch :) Other than that, just follow general PvP strategies
against groups.
Credits...
Thanks to the forum itself, especially Mordanna and Thomas
Drake for support, ideas and a few good laughs ;-)
Thanks to everyone who tolerated me when I hit a 4 week
wall at 97.3 taming :)
Thanks to everyone who never gave up and came and made
this forum possible.
Thanks to Alpha and Spitfire (now retired) who are the
first dragon and first nightmare I ever tamed, respectively.
You helped me persevere ;-)
All of the images should be linked to a higher resolution
version of the same...
Feel free to add in constructive criticism, witticism,
friendly fire or anything else you deem appropriate. I appreciate
feedback of all kinds (except trolling :)
- Gabrielle DuNoir
|


